Prep:  20 Minutes, plus 1 hour cooling time
Cook:  50 Minutes
Serves:  8
Average: 3.9 (9 votes)
Difficulty:
Cuisine:
Saved:
105
Recipe by: KitchenAid
This amazing cheesecake is based on a recipe by food writer Rose Levy Beranbaums. KitchenAid has taken a classic and created our own version: simpler to make and with a biscuit crumb base. This recipe uses the KitchenAid Platinum Stand Mixer KSM156 with the Food Grinder/Mincer Attachment.

Recipe Shopping List

* I have read and agree to myfoodbook's Privacy Policy
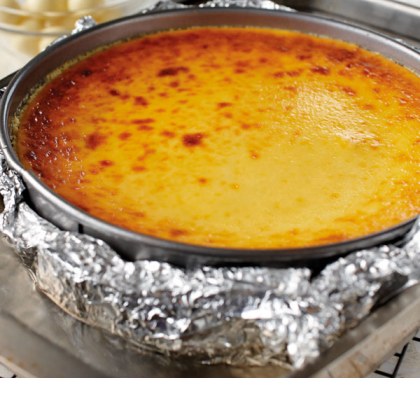
White Satin Cheesecake
Ingredients:
Base
Cheesecake Filling
Method:
Base
  1. For best results use the KitchenAid Platinum Stand Mixer KSM156 with the Food Grinder/Mincer Attachment.
  2. Preheat the oven to 180°C (160°C fan forced). Line the base of a heavy duty, 22cm spring form cake pan with baking paper and wrap a layer of foil across the outside base and up to the top of the pan. This is to prevent leaks.
  3. Attach the food grinder, fitted with the coarse plate, to the stand mixer and place the mixing bowl under the chute. Turn the mixer to speed 6 and grind the biscuits.
  4. Attach the mixing bowl, containing the crushed biscuits, to the stand mixer along with the flat beater. Add the butter and sugar to the crushed biscuits and mix on speed 2 until well combined. Press the mixture firmly into the base of the prepared pan. Refrigerate while making the filling.
Tips & Hints:
  • If you prefer a finer textured base use the fine grinding plate to crush the biscuits.
Cheesecake Filling
  1. Gently melt the white chocolate in a heat proof glass bowl, placed over a saucepan of simmering water. Stir the chocolate until smooth, taking care not to overheat. It is important that no steam or water gets into the chocolate otherwise it will 'seize' and become grainy.
  2. Attach a clean and dry mixing bowl to the stand mixer, fitted with the flat beater and the pouring shield. Add the cream cheese and sugar to the bowl; turn the mixer to speed 4 and beat until smooth. Add the corn flour and then the eggs, one at a time, beating in between each addition. Scrape down the sides of the bowl with a spatula. Add the lemon zest and lemon juice, vanilla and yoghurt. Mix until just combined. Pour in the cooled chocolate and lightly mix.
  3. Place the prepared spring form pan in a large baking dish and pour the chocolate mixture into the prepared cake pan. Fill the baking dish with boiling water until the water comes about half way up the sides of the spring form pan.
  4. Bake on the centre shelf of the oven for 45 to 50 minutes until set. Turn the oven off and leave the baking dish in the oven, with the door ajar, for 1 hour to allow the cheesecake to cool slowly. This prevents cracks appearing in the top of the cheesecake. Remove the pan from the baking dish and allow the cheesecake to cool completely before carefully removing from the pan.
  5. Dust the cheesecake with icing sugar and serve with berries or stone fruits.
  6. This cheesecake is best eaten on the day it is made as the texture before refrigeration is simply divine and very luscious. Refrigerate any cake that isn't eaten the day it is made.
Tips & Hints:
  • Ensure the chocolate has cooled, but is still liquid, before adding to the creamy mixture. If the temperatures of the chocolate and cream mixture are too different, the chocolate will set and the mixture will not be smooth. To make Gluten Free, please use Gluten Free 'tea biscuits' - or similar in the crust to replace the Digestives.
FacebookPintrestX (Twitter)Google ClassroomShare via Email

More Cheesecakes recipes from KitchenAid

Feedback and Reviews

Enter your food preferences

No reviews for this recipe yet.